Simple Stories Posh

I’ve been having a little play with the Simple Stories ‘Posh’ collection this month. I picked just four 12×12 papers to use with the chipboard and sticker packs and added enamel dots and brads from the collection too.

My little hoard from the collection included the papers Choose Happy, Laugh Lots, Love Life and Simply Amazing, 6 x 12″ chipboard pack, 12 x 12″ combo sticker pack, enamel dots and adhesive bradz, plus the word label sticker pack.
I started by making two scrapbook layouts choosing the most appropriate embellishments from the collection to go with the stories I wanted to document.
Layout 1. Dream

I began with a 8.5 x 11″ piece of white cardstock (from this Bazzill Basics 25 pack) and knew I wanted to use the foiled chipboard word ‘dream’ from the chipboard pack for my title. I am in love with the navy and cream striped paper ‘Simply Amazing’, it was perfect for the angles in the photo too. I mounted the 3.5×3.5″ photo on a piece of craft foam and layered three papers underneath and placed that to the side on a couple of wide strips of paper (the arrow paper is the b-side of the stripe paper). The other papers I used were Choose Happy (yellow b-side) and Laugh Lots (peachy red b-side).

I was concerned the background was too white and plain, so I pulled up the papers and photos, thank heavens for Herma repositional adhesive! I hunted out a really, really old polka dot mask by Heidi Swapp which I’ve had in my stash for years, placed it on the cardstock and painted cream acrylic paint over the holes. I let that dry with the help of a heat tool and then splatted dark blue spritzing ink over it, also from my stash. I wish I’d had textured paste so that the polka dots looked more like the bumps on the railway girder, instead I applied the paint thickly with a couple of layers. I reassembled my page once the paint and ink were dry, added journaling on a luggage tag slipped under the striped paper and placed chipboard accents and stickers on the page. I actually cut the chipboard dog in half and placed the ends either side of my photo. I added a little strip of striped paper to the top and bottom of the layout to ground everything and embellished those too. Finally I added word label stickers, adhesive bradz and enamel dots.
Layout 2. The Big Project Life Catch Up

For this layout I used the mini polka dot side of Love Life as my base and added a wide strip of Choose Happy paper (the floral), edged with two thin strips of Simply Amazing paper. The Choose Happy paper has two floral placements on it and I wanted one to be on the opposite side of the photo to create a visual triangle with the two chipboard florals. The florals worked well because of the florals in the paper I’d used in the photo (really old Basic Grey Lollipop Shoppe collection), I’ve been stash busting for my big project life catch up of 3 months.
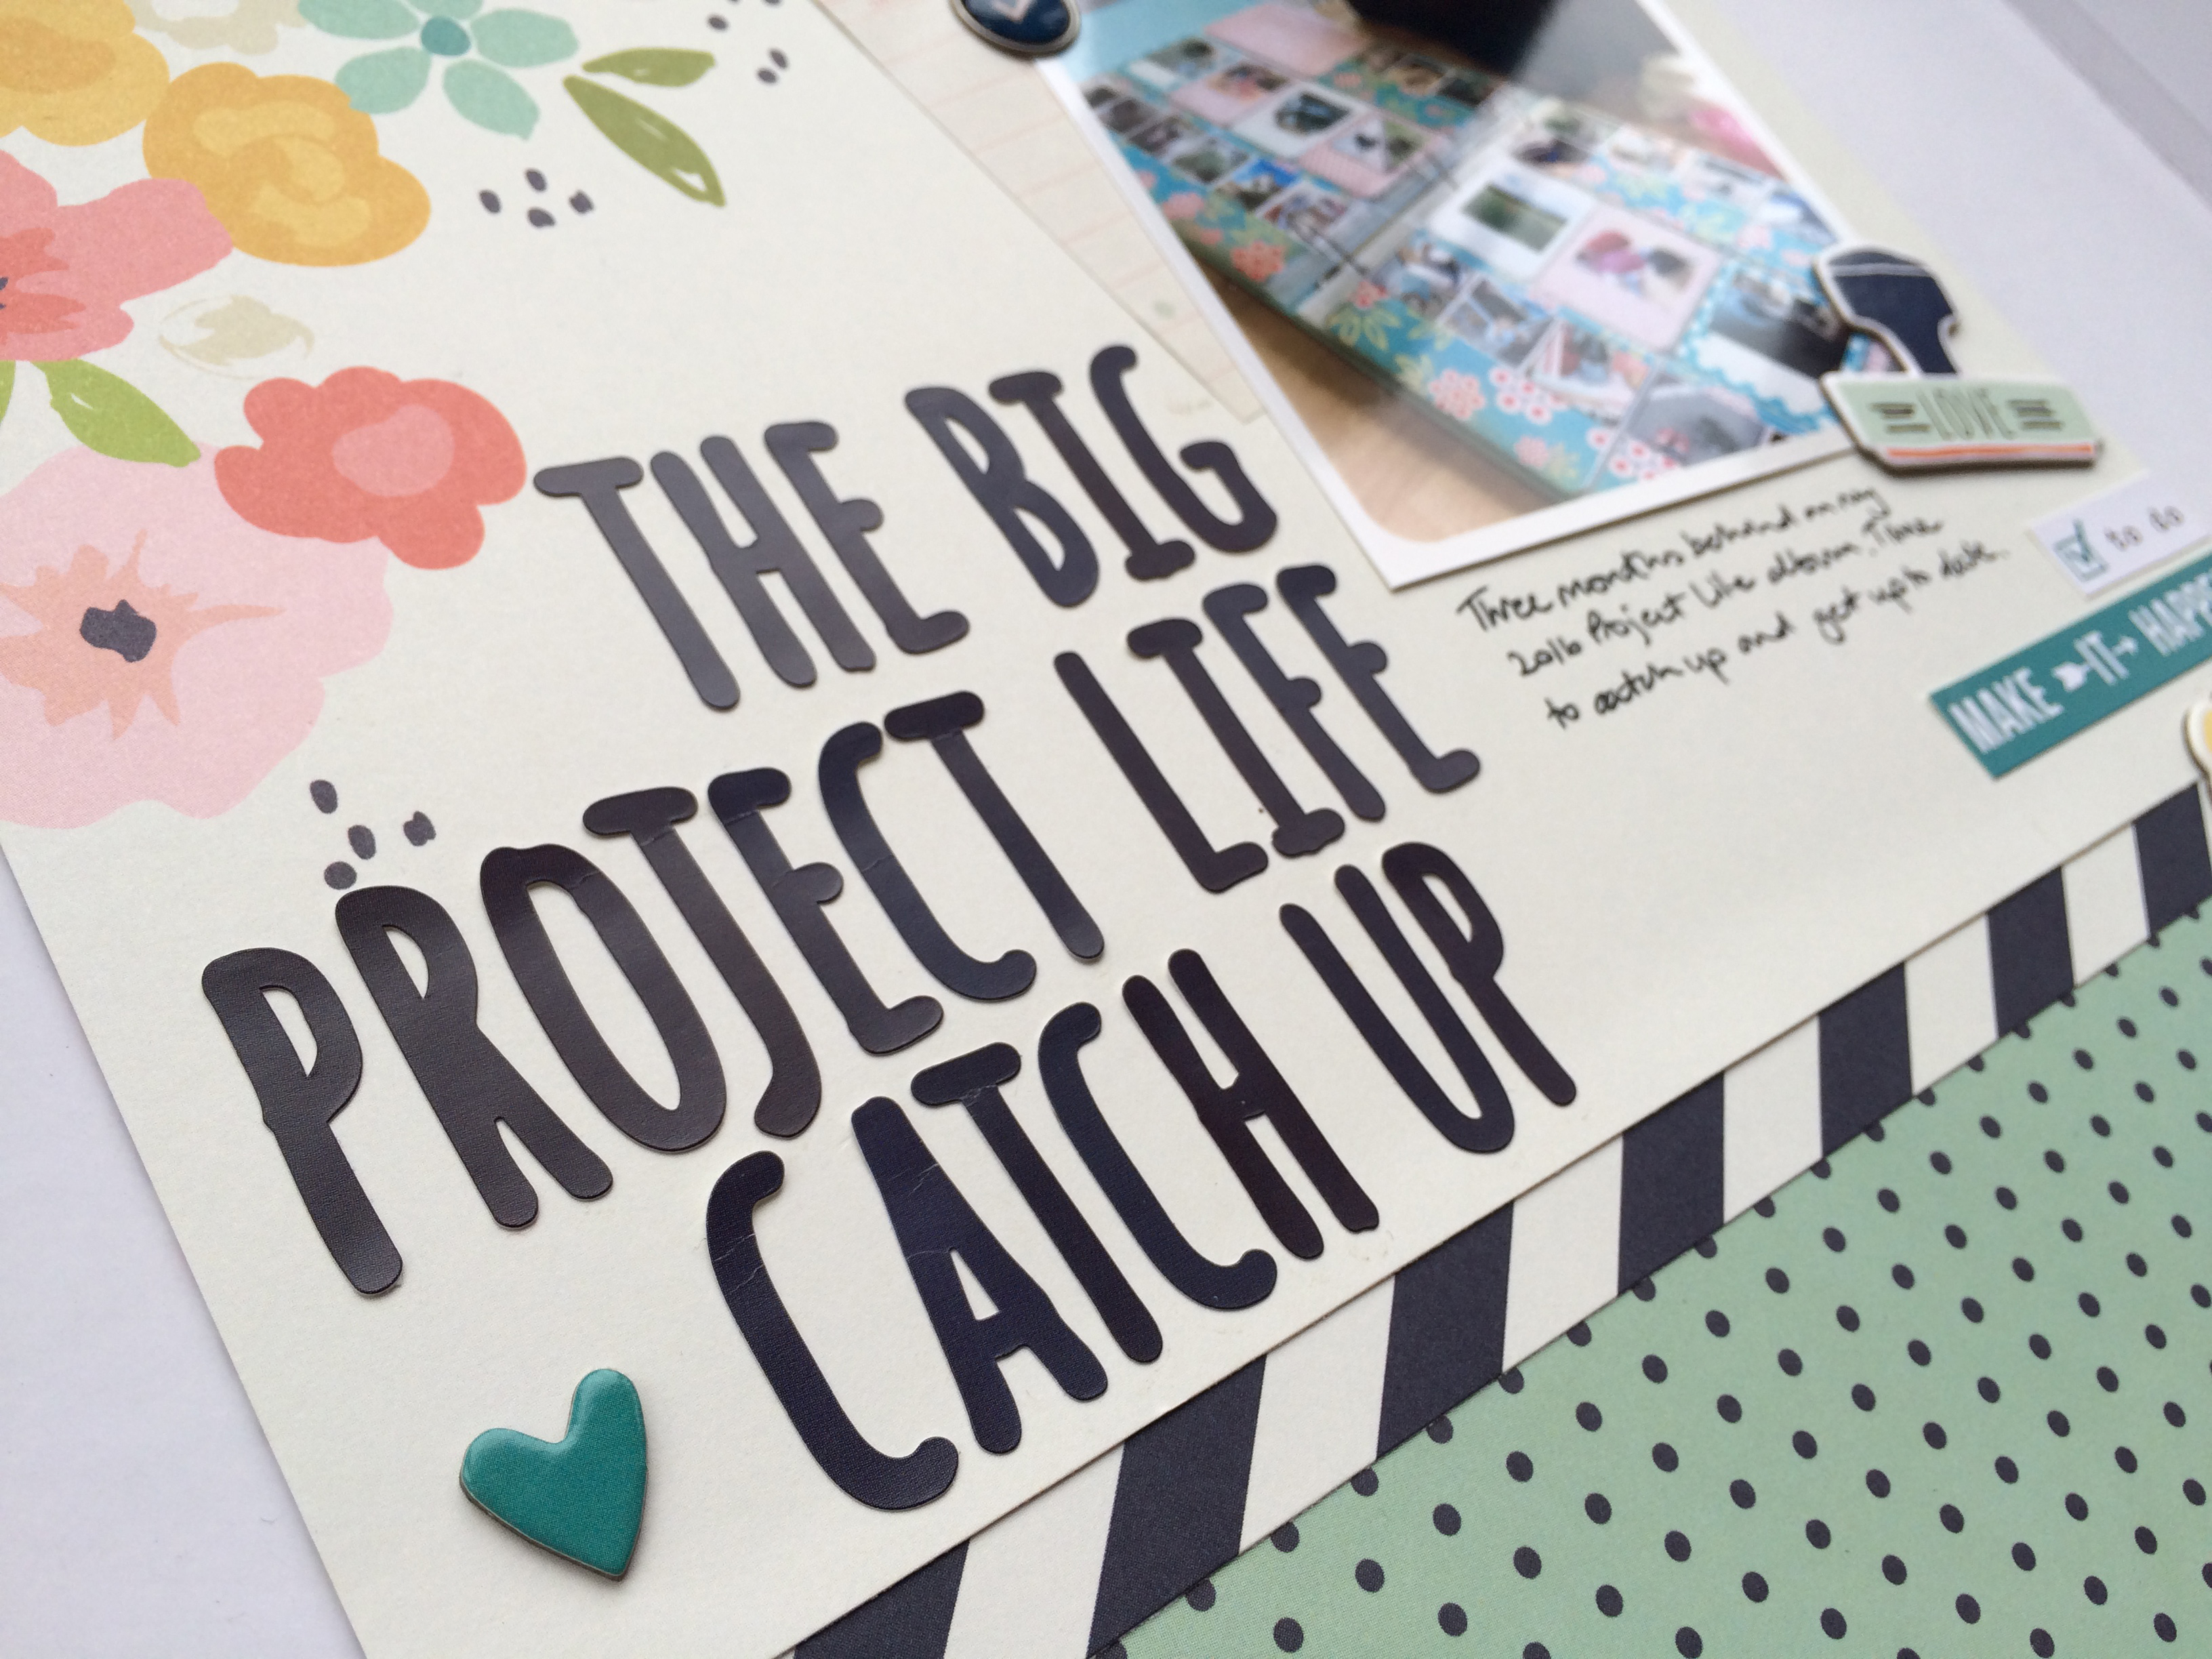
The 12 x 12″ Combo Sticker sheet has large size alphas on it, perfect for matching the navy in the collection for the title, I really like the font of these alphas too. I needed something extra under my photo, so I pulled out a sticky note from The Reset Girl collection by Simple Stories and tucked that under my photo, everything else is from the Posh collection.

Cards
After making these layouts I looked at what I had left in the chipboard and sticker packs and decided the best way to showcase them would be to make cards. I intended just making a couple, but once I got started I kept making and ended up with seven!

I used A6 (roughly 4×6″) and 4×4″ kraft card blanks for these, but you could use white card blanks for the A6 cards or make your own card blanks from cardstock, you can buy envelopes in the store here.
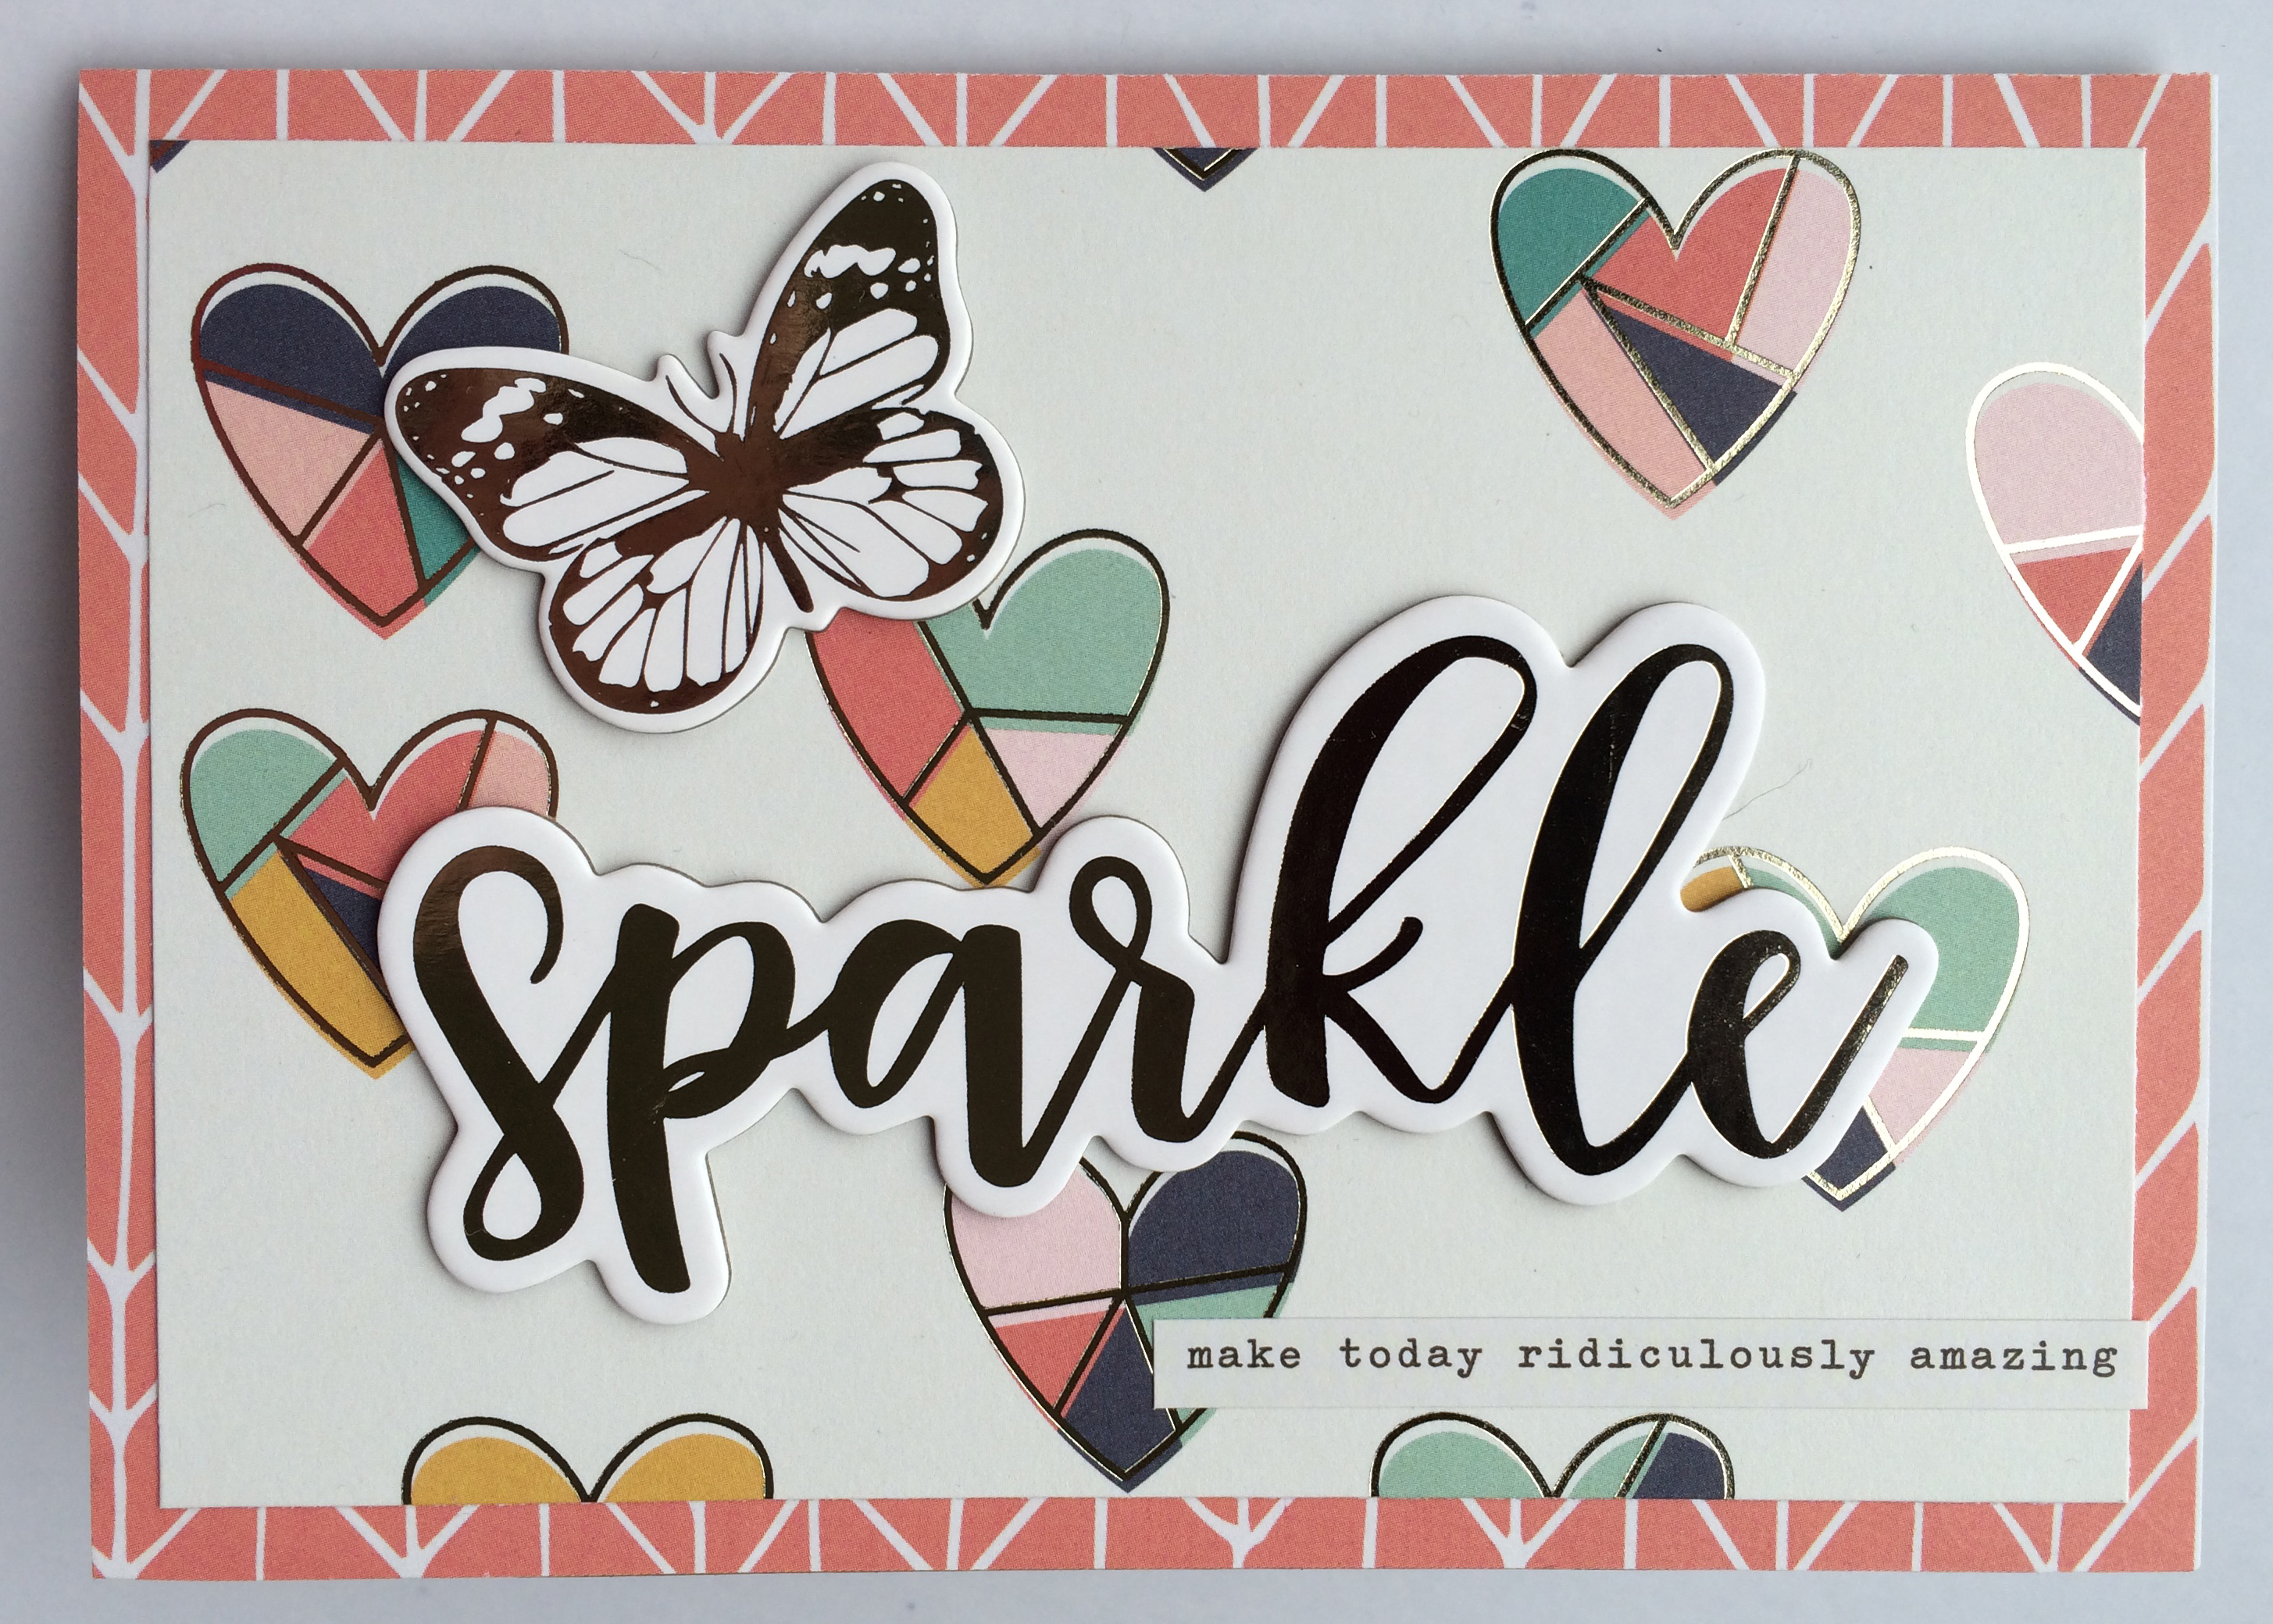
I used the foiled chipboard word Sparkle as the starting point for this card, placing it on top of the foiled Laugh Lots paper which in turn was mounted on a piece of the b-side of that paper. I added a foiled butterfly, also from the chipboard sheet and a word label sticker from the collection.

This card was super simple to make. I cut a piece from the Choose Happy paper that had the other floral placement and kept the branding strip intact as it added a nice element to the card without the additional fuss of cutting more paper! I mounted the ‘sparkle & shine’ sticker on foam pads, popped that at the top and added a word label sticker at the bottom.
![]()
I would have found this ‘choose your own arrow’ chipboard sentiment difficult to use on a layout, but I think it works well for a positive good luck kind of card, especially when teaming it with the word label ‘anything is possible’. I simply covered the card front with the arrow side of the Simply Amazing paper and mounted the accent on the polka dot side of the Love Life paper.

I love balloons, they are the perfect accent for birthday cards. I covered the card with that lovely striped paper Simply Amazing, added a cream piece on the centre cut from the Choose Happy paper and added the chipboard balloons accent on top. I finished it with three enamel dots down the top left, a fun adhesive brad on the bottom right corner and a hip hip hooray word label sticker. So simple, but really cute.

Then I moved on to 4×4″ kraft cards to use up some smaller accents. This one uses the striped Simply Amazing paper and the yellow reverse side of Choose Happy, plus a heart and an arrow chipboard accent. I typed the sentiment on cream card on my typewriter for this and the last two cards.

I absolutely had to use the bouquet of flowers for a birthday card! I layered a 3.5×3.5″ piece of floral paper, the a-side of the Love Life paper with a 3×3″ piece of Simply Amazing paper and popped the sticker on foam pads. I backed the sticker with cardstock before popping it up on foam pads, which is something I often do to give a sticker more strength, however I must confess that it was tricky to cut neatly around the shape. In hindsight I think it would have been fine not to bother with this step, especially as the sticker wasn’t very big. I added a floral adhesive brad to the top corner and placed two sentiments typed on my typewriter. The ‘for you’ sentiment is glued directly to the sticker and the ‘happy birthday’ is mounted on foam pads to give it height and definition.
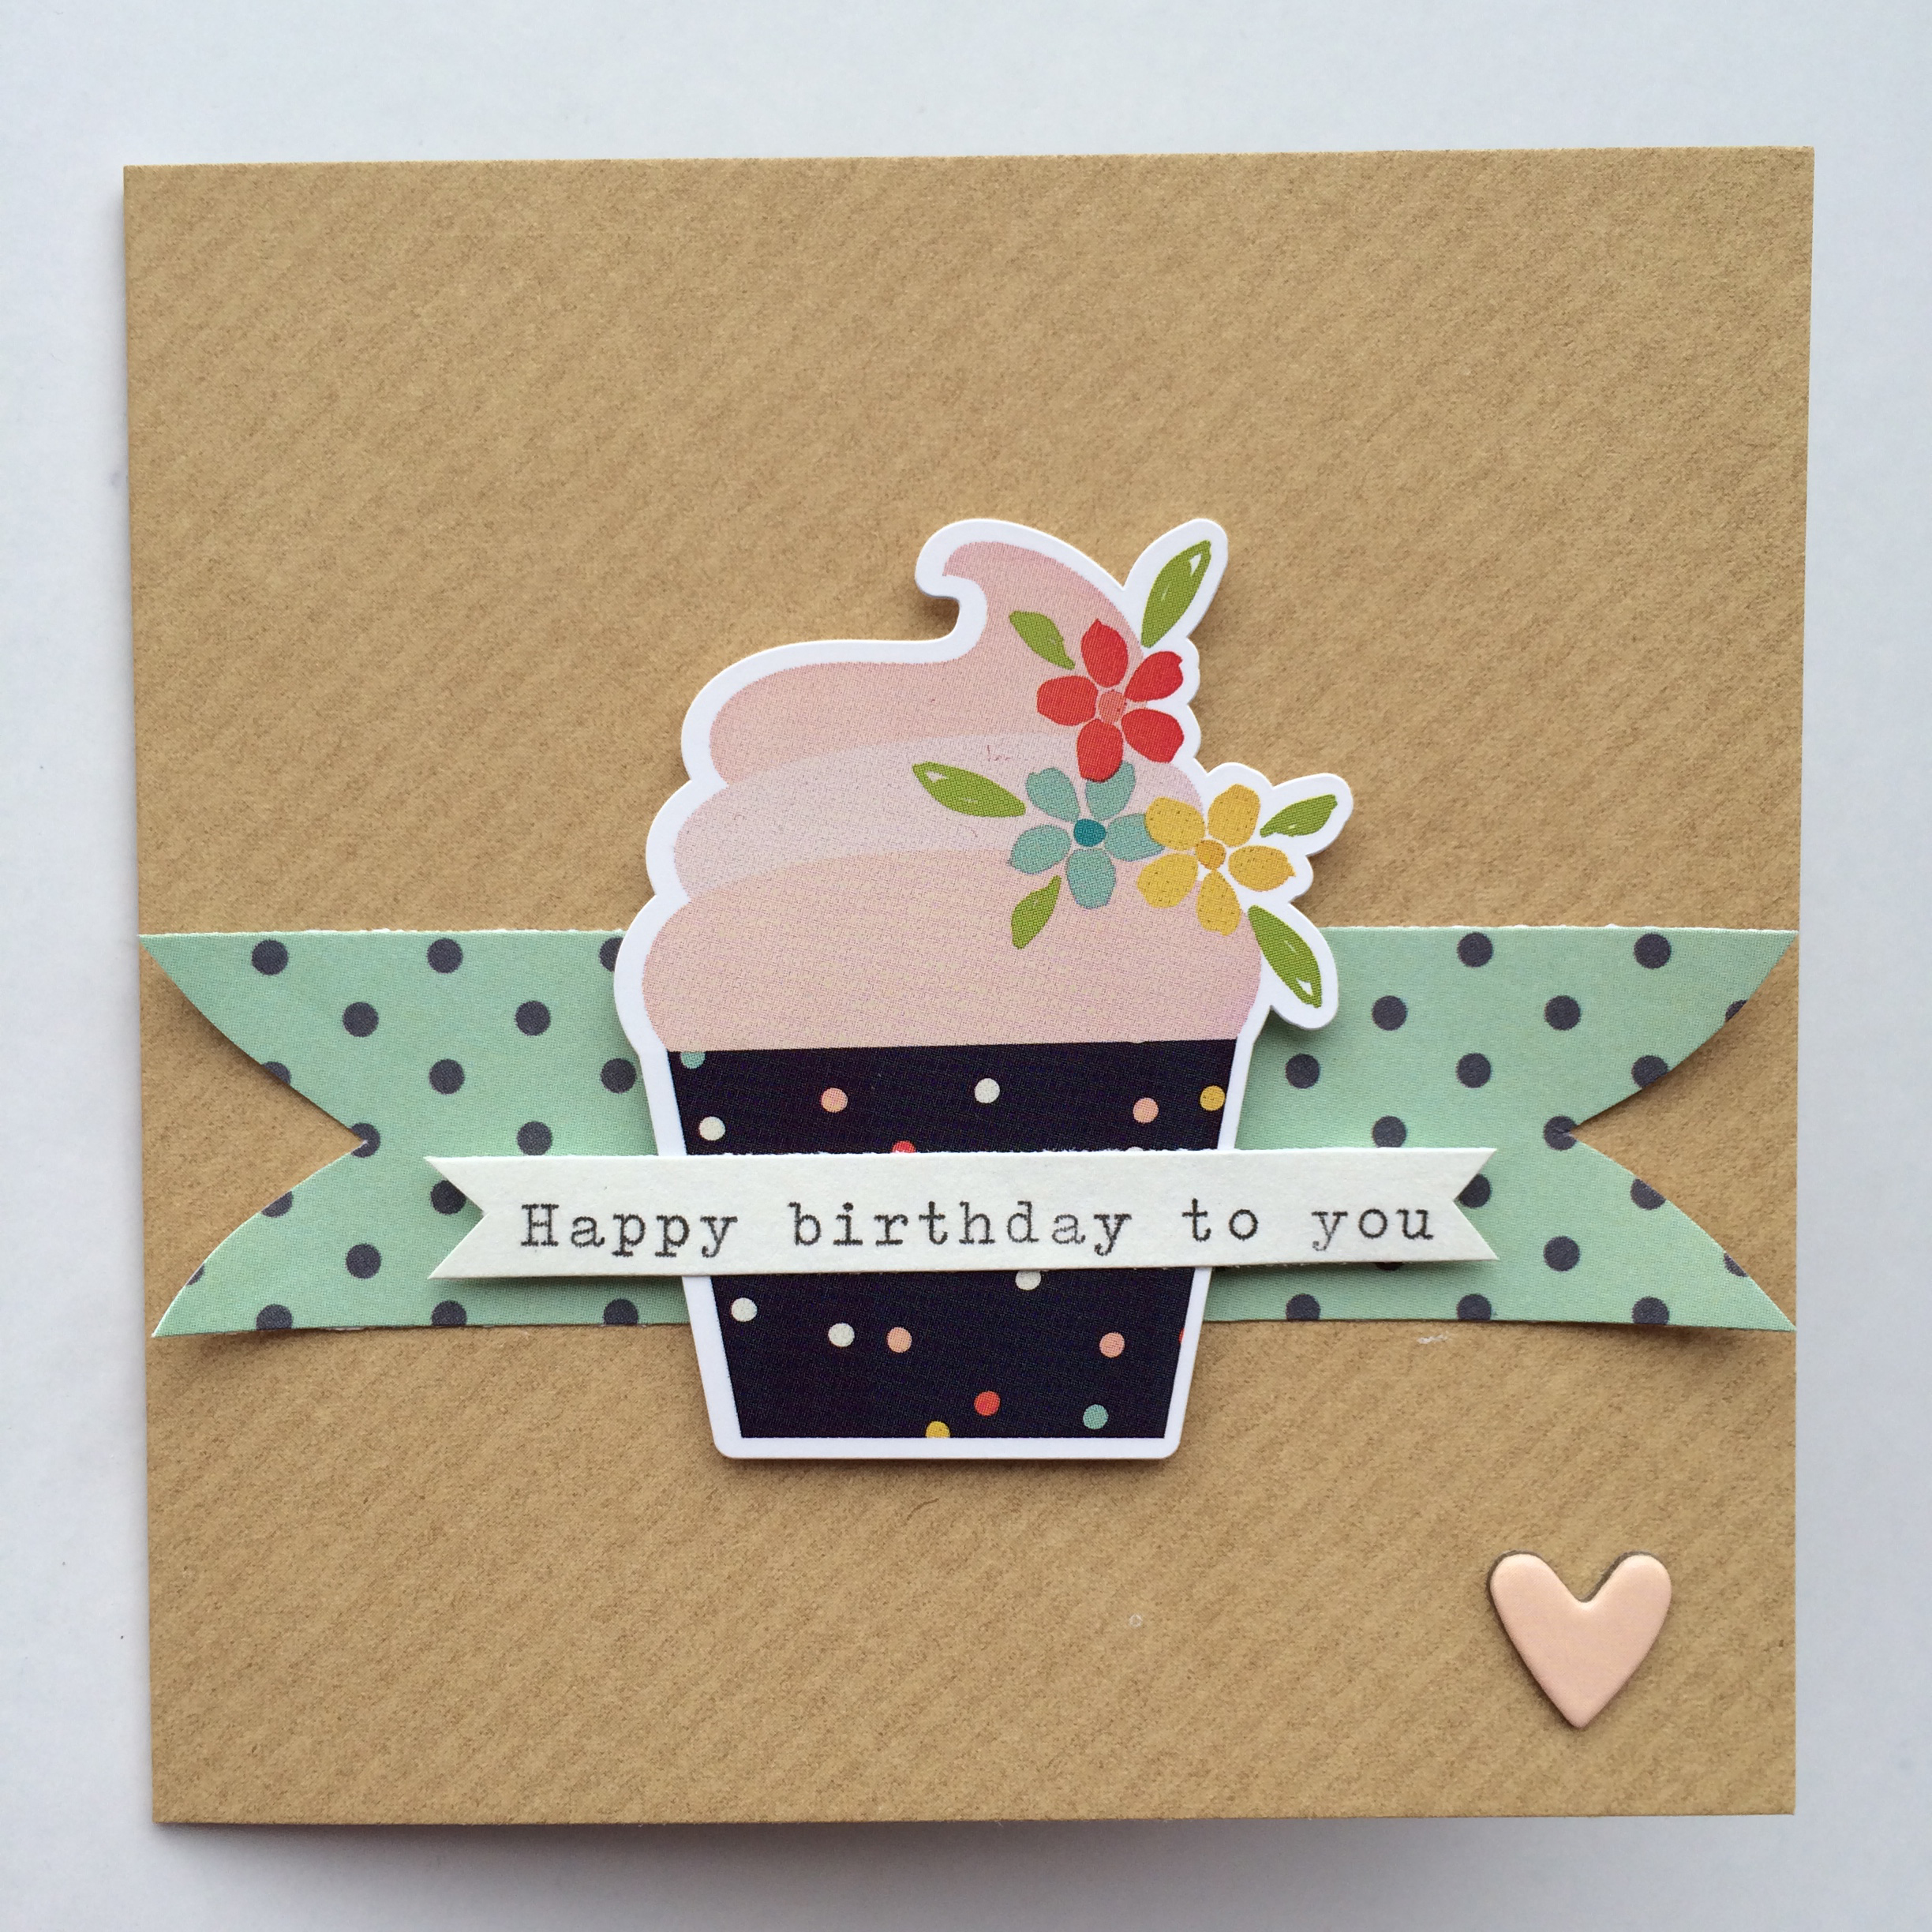
Lastly the cupcake card. How pretty is that cupcake sticker? It is perfect for a birthday card. By this stage I was running out of paper, remember I only had 4 sheets for these projects. But actually I love the sweet simply look of this card and a good reason for using kraft card blanks. I love the natural look, texture and warmth the kraft colour brings. All I did was to cut a fishtail banner from the b-side of Love Life paper, attach that to the card front with double-sided tape and curl up the fishtail ends. Pop the cupcake sticker on foam pads (no cardstock backing this time) and place that on the banner. Finally I placed a typed birthday sentiment on the cupcake and added a little pink chipboard heart to the bottom of the card. Sweet.
Thanks for stopping by, you can find this lovely Simple Stories Posh collection here in the Hey Little Magpie store.
